PREPARING IMAGES FOR DIGITAL PROJECTION
NPSNZ recommends a standard image size of 1620 x 1080, that size will project correctly on the NPS projector. This isn’t compulsory as the computer does a good job of resizing the images anyway. The following should help you prepare your images to be shown to their best at our meetings.
The files should be saved as jpegs. If you have a choice of colour space please choose sRGB, most digital cameras use the sRGB colour space. You don’t need Photoshop or any special software to do this, what comes with your computer works fine. Detailed instructions below for Macs and PCs
File size:
The file for 1620 x 1080 it will generally be less than 2 MB.
Sharpening:
If you wish to sharpen the image, this is likely to be more effective if done after the image has been set to the final size. Take care not to over sharpen as this can give an unpleasant appearance.
File Naming Conventions for Members Images
A plea to the members of NPS to help out the projectionist. Please can you follow these steps when naming and providing your files to be shown during Members Images.
Rename the file as per this example: your name-number-description of image.jpg (you can use hyphen or underscore)
e.g.
Joe Bloggs-01-Big hill.jpg
Joe Bloggs-02-Blue lake.jpg
This is for two reasons, it ensures all your images are shown together. It also ensures the person who has to download the files can quickly and easily identify the correct ones. Please only bring files with the extension .jpg. Our system is set up to handle jpeg files.
Media – how you bring your files to the meeting:
Files maybe uploaded to our dropbox or emailed directly dropbox and email details.
Alternatively image files can be accepted on a USB flash drive. Ideally there should not be any additional files on the media. If you do have other files please make sure the images are in a clearly labeled folder.
FAQ:
Question Can I bring my files as PNGs, PSDs, TIFs, GIFs, BMPs, PDFs, EPS?
We ask you bring only JPG (JPEG) files. JPEG is an industry standard for image sharing developed by professional photographers. Our system is set up to handle jpeg files. To ensure our meetings run smoothly we maintain the right not to accept files which are not jpegs.
Question What if I have images already prepared for projection at 1024 x 768 pixels?
No problem, the size less than the projector can handle so the image will not fill the entire screen
Sizing your images for projection – using software on your computer
Mac users
All Macs come with Preview … great for viewing PDFs, photos etc. Preview has some elementary, but very useful image editing tools … exposure, contrast, colour, sharpness, cropping and sizing.
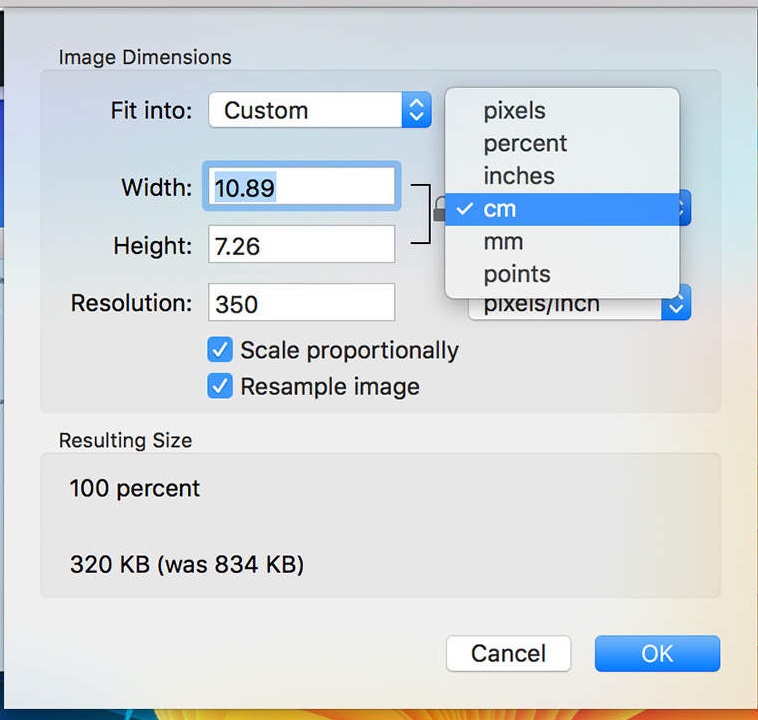
- Open your image in Preview and choose Tools -> Adjust SIze
- In this case the image is larger than it needs to be. 3959 x 2832 pixels for a file size of 3.7MB.
- Make sure
pixels is selected as the measurement, and the
Scale Proportionally & Resample Image boxes are ticked, then for:
-landscape / horizontal images type “1620” in the width field (the height will take care of itself … but check is less than 1080).
– portrait / vertical images type “1080” in the height field, the width will take care of itself. You’ll notice the file size
has reduced from 3.9MB to 569KB.
- If you wish you can check the colour space of your image and set to sRGB. Go to the Tools menu and choose “assign profile”.
- Finally save the image as a jpeg (if not so already). Select a quality setting of 9 – 10 (at the best end of the scale). All done with what comes with your computer! You could achieve a similar result by exporting your images from iPhoto.


PC (windows) users
Windows machines have Paint for basic image handling (Start/ All Programs/Accessories/Paint).
Select Home/Resize. Maintain Aspect Ratio and work in pixels.
Enter 1080px for height. The width will be calculated for you.
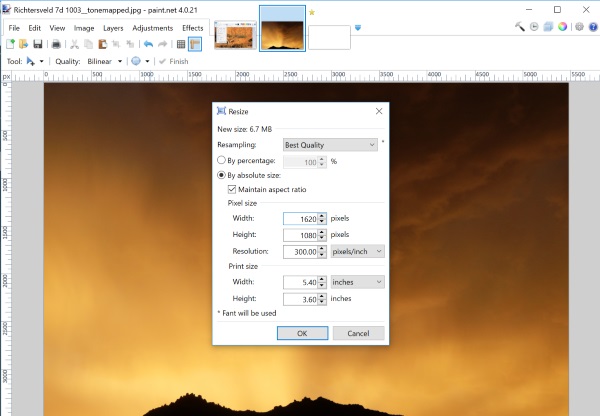
Another more powerful option for windows users is Paint.Net. It’s free. Download from http://www.getpaint.net/download.html .
Select Image/Resize/Absolute Size.
Tick Maintain Aspect Ratio and work in pixels.
Enter 1080px for height. The width will be calculated for you.


